Web Components-1
React, Vue 등의 라이브러리나 프레임워크를 사용하지 않고도
VanillaJS만으로 페이지 요소들을 Web Components로 분해할 수 있는 기능이 있다.
내가 본 유튜브 강좌에선 ‘Custom, Reusable and Encapsulated HTML Tags’라고 소개함.
사실 내가 사용했던 React(Virtual DOM + JSX)가 사용성도 그렇고 모든 측면에서
더 편리하고 좋다는 생각이 들지만, 일단 대부분의 프레임워크에서 공통적으로
사용되는 컨셉이니만큼, VanillaJS로 다루는 법도 공부해두면 꽤나 유익하지 않을까 싶어서.
Web components를 구성하는 3가지 주요 키워드
- Custom Elements
- Shadow DOM
- HTML Templates
Custom elements
- Create custom HTML tags
// 정의
class AppDrawer extends HTMLElement { ... }
window.customElements.define('app-drawer', AppDrawer);
<!-- 사용 -->
<app-drawer></app-drawer>
- Create Custom class
- Lifecycle methods available
※ constructor() : Called when an instance of the element is created or upgraded
initialize, add event listeners, etc.
element의 인스턴스가 생성되거나 갱신될 때 호출되는 메소드.
초기화 작업이나, 이벤트 리스너를 추가하는 등의 용도로 사용.
※ connectedCallback() : Called every time when the element is inserted into the DOM
element가 DOM에 삽입될 때 호출되는 메소드
※ disconnectedCallback() : Called every time the element is removed from the DOM
remove event listeners
element가 DOM에서 삭제될 때 호출되는 메소드.
주로 이벤트 리스너를 제거하는 용도로 사용.
※ attributeChangedCallback(attributeName, oldValue, newValue) : Called when an attribute is added, removed, or replaced
attribute에 변화가 생길 때 호출되는 메소드.
attribute는 React의 props와 흡사한 요소.
Shadow DOM
- Used for self-contained components
- Encapsulate styles and markup
Own entity apart from the regular DOM.
Styling is separate from the global CSS of the webpage.
markup이나 style을 custom element 내부에 encapsulate(캡슐화, 가둬놓음)할 수 있게 해준다.
보통의 DOM과는 구별되는 별개의 DOM이라고 생각하면 된다.
그래서, shadow DOM에 별도로 적용한 스타일링은 전체 CSS에 영향을 주지도, 받지도 않는다.
예를 들어, 외부에서 가져온 위젯이 있다고 치자.
대표적으로 트위터의 follow 버튼.
이런 것들은 외부에서 가져온 그 상태 그대로의 모양을 유지하기를 바라는 경우가 많다.
그래서 global styling의 영향을 받으면 안되기 때문에, 이럴 때 encapsulation을 통해
해당 web component 내부에서만 styling을 적용할 수 있도록 해주는 것이 필요하다.
이전까지는 iframe 태그를 사용해서 전역 CSS의 영향을 받지 않은 채로 의도된 스타일을 보장할 수 있었는데
이런 iframe같은 도구에 의존하지 않으면서, 웹 플랫폼에서 기본적으로 encapsulation을
보장할 수 있는 방법이 바로 shadow DOM이다.
-
Create with element.attachShadow({ mode : open });
-
Creates a “shadowRoot” that we can reference and interact with.
HTML Templates
-
Define the encapsulated markup of our web component
-
Template tag stores markup on page (We can later clone or reuse)
템플릿으로 마크업을 저장해놓으면 여러 번 재사용이 가능하다.
-
Include both HTML and CSS in templates
-
Use slots to add custom text Slots allow us to make the template dynamic and add output to it or add custom text to it.
const template = document.createElement('template');
template.innerHTML = `
<style>
.user-card {
font-family : 'Arial', sans-serif;
background : #f4f4f4;
width : 500px;
display : grid;
grid-template-columns : 1fr 2fr;
grid-gap : 10px;
margin-bottom : 15px;
border-bottom : darkorchid 5px solid;
}
.user-card img {
width : 100%;
}
.user-card button {
cursor : pointer;
background : darkorchid;
color : #fff;
border : 0;
border-radius : 5px;
padding : 5px 10px;
}
</style>
<div class="user-card">
<img />
<div>
<h3></h3>
<div class="info">
<p><slot name="email" /></p>
<p><slot name="phone" /></p>
</div>
<button id="toggle-info">Hide Info</button>
</div>
</div>
`;
// HTMLElement 클래스 안에 있는게 아니기 때문에, 여기서는 this.getAttribute()를 사용하는 것이 불가능.
// 그래서 h3 태그를 비워두고, HTMLElement 클래스 안에서 호출할 때 처리한다.
class UserCard extends HTMLElement {
constructor() {
super(); // HTMLElement의 constructor를 호출해야 함.
this.attachShadow({ mode : 'open' });
this.shadowRoot.appendChild(template.content.cloneNode(true));
// node의 복사본을 return한다.
// 인자에 들어가는 boolean(deep)이 true이면, 해당 node의 자식들까지 전부 복사한다.
this.shadowRoot.querySelector('h3').innerText = this.getAttribute('name');
this.shadowRoot.querySelector('img').src = this.getAttribute('avatar');
//this.innerHTML = `<h3>${this.getAttribute('name')}</h3>`;
}
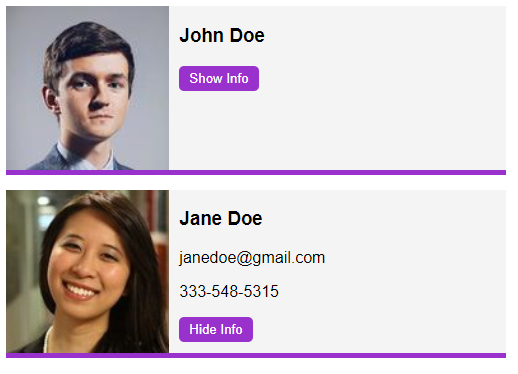
toggleInfo() {
this.showInfo = !this.showInfo;
const info = this.shadowRoot.querySelector('.info');
const toggleBtn= this.shadowRoot.querySelector('#toggle-info');
if(this.showInfo) {
info.style.display = 'block';
toggleBtn.innerText = 'Hide Info';
} else {
info.style.display = 'none';
toggleBtn.innerText = 'Show Info';
}
}
connectedCallback() {
this.shadowRoot.querySelector('#toggle-info').addEventListener('click', () => this.toggleInfo());
}
disconnectedCallback() {
this.shadowRoot.querySelector('#toggle-info').removeEventListener();
}
}
window.customElements.define('user-card', UserCard);
<user-card name="John Doe" avatar="https://randomuser.me/api/portraits/men/1.jpg">
    <div slot="email">johndoe@gmail.com</div>
    <div slot="phone">555-262-6846</div>
</user-card>
<user-card name="Jane Doe" avatar="https://randomuser.me/api/portraits/women/2.jpg">
    <div slot="email">janedoe@gmail.com</div>
    <div slot="phone">333-548-5315</div>
</user-card>
shadow DOM을 사용해서 UserCard 태그를 가둬놓았기 때문에
해당 web component의 template에서 적용한 styling은 외부에 적용되지 않는다.
또한, template에서
user-card 태그를 사용할 때 <div slot="">을 사용해서 데이터를 입력해 준 모습을 볼 수 있다.
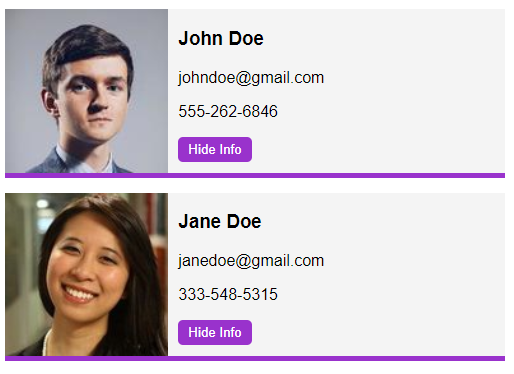
lifecycle method에다가 event listener를 추가하는 구문을 넣어
버튼에다가 interaction을 더해준 모습 또한 볼 수 있다.
+) https://randomuser.me API는 임의의 유저 이미지를 가져올 수 있는 API.
프로토타입을 제작할 때 꽤나 유용하게 사용할 수 있는 api인듯 하다.